Skip to the main content.

7 min read

Lights, camera, inspection!

Part one in a series of blogs:

The last decade or so has seen us all have easy access to digital cameras to capture every aspect of our waking lives and the world around us. Many use smartphones to grab those quick pictures whilst keen photographers like me invest in specialist camera and lighting equipment to get the best images we can in every situation.

Whether using a cheap smartphone or a professional camera with interchangeable lenses, we have all experienced photos which did not capture the scene as we intended. The photograph was out of focus, or too dark or distorted and made our faces look distorted! We have all therefore experienced the weird and wonderful world of light how light interacts with our cameras and the surfaces of the objects we are trying to photograph.

Until now, maybe you haven’t given much thought as to why your photograph of a cat jumping off a bed in a dark room looked terrible!

Industrial vision systems are no different to our cameras we use for fun; industrial vision and lighting systems are also sensitive to the behaviour of light and how it interacts with surfaces. With industrial vision, we also need to understand both the physics of light and the technical capabilities of the cameras and lights we use to capture images.

Over a series of blog posts we will be exploring the world of industrial vision systems and their uses in pharmaceutical and medical devices applications. To start exploring this world, I think it would start with understanding some of the fundamentals of light and the equipment we use. You might be surprised with just how much cross-over there is with getting the best photo of a cake at a birthday party and inspecting a glass vial on a filling line!

Camera!

Ok, I know the title of this blog starts with “Lights”, but let’s start with the camera first.

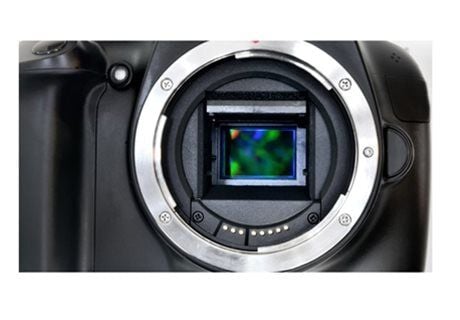
At the heart of every camera is a sensor which is sensitive to light, much like the retina in a human eye. The sensor on many cameras is an array of pixels, which record the intensity of red light, green light and blue light falling onto the sensor. Also like a human eye, a camera system requires the use of a lens to focus light onto the sensor so that the light collected forms an image that we can use.

  • Camera lenses have a number of important characteristics which is useful to understand:
  • Field of view/Focal length – With a long focal length you capture a narrow field of view which is extremely useful to capturing images of distance objects. With short focal length, you capture a wide field and therefore capture of lot more of a scene – landscape photographers like this
  • Aperture – you know how your iris expands when you enter a dark room? Well, cameras use a similar principle to manage the level of light entering the camera. A larger aperture equates to an ability to open the lens iris further and allow more light onto the sensor
  • Depth of field – this isn’t actually a characteristic on it’s own but a function of the aperture and focal length in conjunction with the sensor size and proximity of the sensor to the object. With a large depth of field, more of the image is in focus. With a ‘shallow’ depth of field, less of the image is in focus. A large or small depth of field can be a useful depending on whether you are trying to capture the entirety of a scene or isolate an object from the background/foreground

camera-sensor

Do mega-pixels really matter?

Well, yes…more so for industrial vision system than you might immediately think. On a digital camera/smartphone, pixels just mean you can print bigger pictures, billboard size even these days. Pixels on the sensor of an industrial vision system equates to the resolution of your measurement system.

More pixels equal an ability to resolve more detail and measure smaller defects/artefacts. If you think back to the field of view property of the lens, mentioned previously, the resolution of your measurement system is a function of the number of pixels which the object you are measuring, fills on the sensor. An object which appears large on the sensor (because either you are close or are using a long focal length), in conjunction with a high mega-pixel sensor is better than the image appearing small on the sensor in conjunction with a low-mega pixel sensor.

If you have an object that fills the height of the sensor on a 2000 pixel high sensor this would give you a measurement system 10x more capable that than object that fills 20% of the height of a 1000 pixel high sensor (2000 pixels vs 200 pixels)…that’s like a ruler with mm increments on it vs one with only cm increments!

Before moving on to lighting, industrial vision systems offer another form of sensor not used for other image capturing and that is ‘line-scan’ cameras. We are mostly familiar with ‘area-scan’ cameras (such as smartphone cameras), where the sensor is 2D and captures 2-dimensional image. A line-scan camera is only 1D, i.e. a line of pixel. Capturing a single of line of pixels is surely pretty useless? Yes, it would be except there’s a clever bit…instead of capturing a single still image, these cameras can capture continuously, like a video camera. Now if you pair that with motion of the object (or the camera), you can create a 2D image, that is a long as your motion.

This makes most sense when considering how you inspect a cylindrical object. If you spin the object 360 degrees (a bottle for example) in front of the sensor, the camera records string of 1D images which are pieced together in software to generate a 2D image of the outside of the bottle – clever huh?! Of course, the rotation of the object must be completely in sync with the rate at which you capture line-scans, otherwise you stretch or squash the image!

Lighting!

Now we’ve covered the basics of the camera, a surprisingly important subject is lighting. Our eyes in conjunction with our brains are extremely adept at adjusting to the environment, using the iris to adjust for brightness and reducing the perceived variation in the colour of the light. We also move relative to other objects and so are able to overcome difficulties in seeing shapes by moving relative to them. A camera however, requires our help to be to capture the same image as we perceive. We must adjust the lens or camera sensitivity to accommodate brightness, or adjust the colour balance of the image (colour temperature and colour tint). To enhance the image, professional photographers often use artificial light to create contrast or change colour of objects within an image. Many of us use the simple flash on our cameras/smartphones to do this too (even if we sometimes don’t mean too!).

In industrial imaging, we might not actually want to create an image that represents which looks pleasing to us, but instead we might want to enhance the features on an image to make is easier for software algorithms to identify and use those points to check against reference images or measure distances. To be able to enhance the definition of a feature we want to inspect, first we must understand more about the materials from which the object is made, the shape of the object and where on the object the feature lies.

Here a few examples of techniques used to highlight specific features:

  • Simple illumination of the object relative to the background. Often the background of an image can be too bright and make it difficult to see features on the object (remember last time you were on a Zoom call with the window behind you!). To overcome this, it is common to light the object brighter locally, so that it becomes significantly brighter than the background, like those nightclub photos you’ve seen. Just like the nightclub photos, a flash is a good way of achieving this, using a very intense burst of light but for a fraction of a second. Artificial flashes are capable of being brighter than the sun, very briefly!
  • Different colour light may be used to accentuate the presence of a coloured feature on the object. UV light might even be used to cause the feature to fluoresce.
  • The object may be lit from the opposite side of the object to the camera to create a silhouette of the object. This can work well when inspecting the profile of an object (a shadowgraph) or inspecting clear objects such as glass. When lighting glass from behind, features and imperfections in the glass often appear dark relative to the rest of the object.
  • Ring lighting is used for make-up mirrors at home and also for industrial vision systems for the same reason and that is that is casts light on the subject from a wide range of angles, making is easier to see features on an opaque object, whether that be your neatly preened eyebrows or the details on a label.

ring-light

Inspection!

Now that we covered a bit out cameras and lighting, the next bit is the software. Whether you’re an Instagram user, professional photographer or an industrial vison system guru, the software is a critical element. The software can be used to enhance the image. Professional photographers use software such as Adobe Lightroom and Photoshop to manipulate colour, contrast and sharpness to create aesthetically please images. In industrial vision situations, the motivation is quite different and here image capture for fun and industry diverges.

Industrial vision software is primarily about making use of the image that has been captured. Yes, some degree of image manipulation may be required, but that’s not the primary purpose. Instead, the software is used to create inspection programmes which check, measure or verify the images captures. This is achieved by first teaching the software what we are looking for, i.e. in a specific region of an image, feature X is a specific shape and colour or brightness. Once we have defined these features, we can then use then to write software routines. Feature X can be measured relative to Feature Y, sizes of features, presence or absence of features etc.

industrial-vision-software

If that didn’t already sound somewhat difficult, in the world of pharmaceutical inspections, there are yet further challenges:

What do you do when you’re trying to replace human inspection with automated visual inspection?

Cameras are really good these days…sometimes too good. Pharmaceutical inspections processes often start with a manual inspection, which may not be especially robust. Automated systems have the ability to be far more repeatable and ‘see’ more than the human eye. On other occasions, humans are able to manipulate object relative to their eyes to see subtlety which can be very challenging for a camera. Simply replacing a human inspector with an automated one, may be more problematic than you’d think!

What do you do when the product is variable and new features or defects may appear with time?

Now we’re getting to the really exciting bit…artificial intelligence and big data. Before you think I’m going all sci-fi, this is now a real technology and holds fantastic potential in some scenarios. The latest high end software systems offer the ability to collect huge numbers of images and analysis of those images to be able to trend changes and ‘learn’ what may be a defect. This is unlikely to replace your simple label checking for example, but holds great promise when dealing with inspection of subtle changes the content of pharmaceutical vials.

A big subject

You’ll probably have gathered from reading this far, that capturing images whether for fun or for industrial inspection purposes, is a complex topic. There are many types of cameras, lenses, lights and image inspection/editing software. These combined with the huge variety of subjects which you might want to capture images of, will either leave you excited at the prospect of hugely challenging and rewarding subject with endless opportunities to learn, or leave you bewildered and picking up the phone to get some else to do it for you! I think you can guess which applies to me.

Just in case you were wondering, I’m a Canon user: 5D Mark iV and 7D Mark ii, with Canon 85mm 1.4 L IS, Sigma Art 50 1.4, Sigma 35mm 1.4, Canon 70-200 2.8 L…OK, OK, I think you get the idea, the list goes on.

In the unlikely event that you’ve made it this far and are interested in discussing further, I’d be delighted to chat, for fun or professionally. Please do contact me – David.phasey@3pinnovation.com

Understanding aseptic powder filling: Key principles & techniques

Understanding aseptic powder filling: Key principles & techniques

Aseptic powder filling is a critical step in pharmaceutical production, particularly for medications that require sterile administration such as...

Read More
Shaping the future of ATMPs: tailored automation and advanced technologies for the next decade

Shaping the future of ATMPs: tailored automation and advanced technologies for the next decade

If history is to repeat itself, the next 10 years will see significant activity regarding the automation of advanced therapy medicinal products (ATMPs

Read More
The Basics of Cell Culture: Key Steps in Manufacturing Cell Therapies

The Basics of Cell Culture: Key Steps in Manufacturing Cell Therapies

Introduction Cell therapies represent a promising frontier in medicine, offering potential treatments and cures for a wide range of diseases....

Read More